
Right next to building your home from the ground up, replacing your siding might be one of the most significant investments you make in your home.
When looking to invest a high dollar amount into any project or product, you want to know that you will get your money's worth.
Whether you’re replacing your entire siding or just getting a small area patched up, the installation is key to ensuring it will last.
Even with the highest quality products, a faulty installation will cause your siding to fail within months.
Video Down Below: "What makes a high-quality siding installation?"
Knowing what to expect from a siding installation is essential. Knowing the difference between a high-quality installation versus a low-quality one will help you choose the right contractor and know they will complete your project to your satisfaction.
Southwest Exteriors has been a locally established home remodeling contractor for over 30 years, and our team has seen many low-quality siding jobs. We install James Hardie fiber cement siding under the manufacturer’s best practices.
When the job is done, an inspector will come out to your home to ensure that the job was done correctly so that you know you have gotten a high-quality siding replacement.
This article will outline the entire siding installation process and point out what a high-quality and low-quality installation looks like.
We’ll look at the entire process of a siding replacement from pre-installation to the finishing touches and detail the best practices for each step.
After reading, you will know what to look for in a quality siding installation to help prevent choosing a shoddy contractor and avoid a faulty installation.
Before your home siding installation project
There are many precautionary measures to be taken before the beginning of a siding replacement.
Before the project’s construction begins, you want to know all the details regarding where the crew will store equipment and how cleanup is handled.
Scheduling a pre-installation meeting
A quality contractor will schedule a consultation with you before the installation day to go over details like where the dumpster will be placed, where equipment will be set up, where cables will be stored, and how debris will be cleaned up.
Scheduling a pre-installation meeting allows you to get all the details that you may not have thought of before. This also gives you time to ask any additional questions about the installation.
During this time, the contractor should finalize all other details of the project, such as the style of siding, colors, and customizations you have decided on.
If a contractor does not offer a pre-installation meeting and either send information about your project digitally or not at all, this leaves room for miscommunication. This also puts the responsibility on you as a homeowner to make sure your project details are correct.
If information gets lost in translation, this can lead to mistakes in your project and disappointment from the result.
What needs preparing before the installation
Shrubs and branches near the siding should be trimmed, furniture and items on the walls and shelves should be moved, and tarps should be put down to protect foliage and collect any debris.
Some contractors may trim branches and move furniture for you, but it is common to be your responsibility before construction begins.
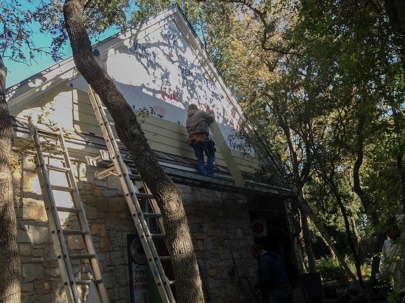
During the actual installation, the crew should take proper protective measures to protect your home from debris or possible damage.
During the siding installation
Though pre and post-installation are important in the process, the actual installation of your siding is the most crucial to success.
There are many aspects to the siding installation that must be done correctly and in the correct order to ensure the siding will last.
The siding installation consists of stripping the existing siding, installing the substrate, installing the trim and flashing, and finally painting and caulking.
1. Removing existing siding
When removing the existing siding, there is a lot of debris that can fall during the process.
The crew should place a tarp or protective covering down along the siding to catch all debris for a thorough cleanup.
Measures should also be taken after the project is finished to inspect the entire area for any loose debris that was not picked up, which we will outline later in this article.
If protective measures are not taken before demolition begins, excess debris residue that can be potentially dangerous to the environment and you.
The removed siding should be taken immediately to the dumpster when finished.
During the removal process, the best installers will take care of your home and ensure a clean workspace.
2. Placing the substrate
For a siding replacement, the substrate is a thinner layer of siding that goes down underneath the actual siding.
This adds a layer of protection for your home and provides more stability for the actual siding.
A popular material for the substrate is oriented-strand boarding or OSB. It is made of wood chips patterned diagonally and connected by an adhesive, and it is similar to plywood.
A popular way to install substrate is using a staggered pattern. The substrate is installed from the bottom up and in an alternating staggered manner instead of straight lines across.
After the substrate is installed, a weather barrier should be stapled on top of it. This is another layer of protection specifically made to protect the interior from moisture.
Between the substrate and weather barrier, there are going to be open seams that need to be covered.A joint tape is used to connect the pieces where there is a seam between pieces of substrate and weather barrier or around windows and doors.
If a joint tape is not used between seams, this leaves room for water to get into the substrate and frame of your home, which can cause rot and weaken the wall.

Example of joint tape.
If a contractor does not use substrate or a weather barrier, this is a red flag. While no substrate may bring the cost of your project down, it decreases the value of your siding and will not provide proper protection and insulation for your home.
This should be discussed prior to the installation, either during the initial consultation or a pre-installation meeting.
3. Installing the trim and flashing
The trim is placed around windows, doors, and the edges of the siding to give it a finished look. The flashing is placed on the roofing edges and works to direct water away from the roofing.
The trim and flashing are caulked and sealed to lock in the joint tape and provide another type of weather barrier around open seams. They should both be installed before the actual siding.
When standard lap siding is laid down, it is laid from the bottom up so that the board above will slightly hang over the one below.
If the trim and flashing are installed after the siding is installed, this creates a wider gap between the trim and siding, and the trim and flashing will stick out in a way it is not supposed to.
The gaps will then need to be filled with caulk which leaves more room for water to get in - installing the trim and flashing before the siding gives it a tighter fit.
The trim should be nailed with a trim nailer using finishing nails as opposed to coil nails. The finishing nails are smaller than coil nails, and when nailed in, the nail’s head is not visible.
The coil nails are used to install the siding.
After the trim above all doors and windows has been installed, a type of flashing called Z-flashing is installed above the door and window frames.
The flashing piece is shaped like a long Z and is placed with one edge against the siding then the other hanging slightly over the trim. This creates a waterproof seal above the frame and redirects water from sitting on top of the frame.

Example of Z-flashing.
L-flashing is also installed after the substrate and before the weather barrier. This flashing borders the bottom of the substrate and the foundation to keep insects and water away.
If neither Z nor L-flashing is installed, there is a higher chance of water seeping in around the trim, which can cause rot and preventable damage.
4. Installing the siding
Now that the substrate and trims have been installed, it’s time to put down the siding.
When installing siding panels, the best practice is to start from the bottom up with horizontal siding. The panel is nailed at the top with coil nails, and the panel above will hang slightly over to cover the nails below.
This not only creates a tighter seal but gives a cleaner look.
As the siding is installed, outdoor outlets and water spouts must be protected and sealed. A plastic bezel, or framing, is placed around the water spouts and electrical outlets connecting to the wall to create a waterproof seal.
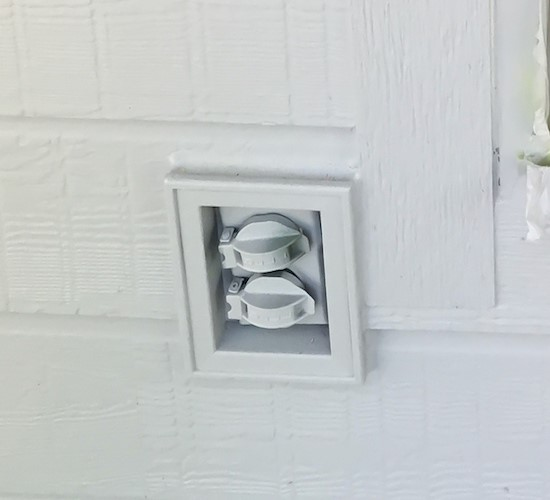
Example of plastic bezel.
The areas are then caulked and sealed around on top of the weather barrier. This makes it easier to fit the siding around the outlets and water spouts and sealing around them while also providing a clean and finished look.
If the plastic framing is not used around all outlets and water spouts, it is more difficult to fit the siding around.
This will also leave room for more open gaps, which can allow water to get in.
5. Caulk and paint
After the siding is installed, the final step is to caulk around the edges and paint.
When it comes to caulking, the product and application are key to the quality of the installation. If a caulk with a lifespan of fewer than 50 years is used, it is not a good caulk.
The purpose of the caulk is to seal the edges and joints so water and insects cannot make their way into the siding. If the caulk is not applied properly, it will not do its job in sealing the siding.
The nail heads will need to be spackled as well for a quality installation and clean finish. Spackle is a plaster-based product.
If you filled the nail heads with caulk instead of spackle, it would not fill out the space fully and as smoothly.
While paint may be seen as solely an aesthetic aspect, it provides another layer of protection for the siding.
Before painting even goes down, the entire siding area should be power washed and cleaned off. If it is not cleaned, the paint will trap dirt and residue underneath, and the coats will not go on evenly.
All window frames and openings should be covered to protect them from paint.
A primer should always go down before applying the top coat of paint. The number of coats for the topcoat should correspond with the mil of the paint.
Using a sprayer that projects the primer evenly and allows you to build up the thickness of the primer is quality practice. While using a brush roller is not incorrect, it picks up the dispersed product and can make the job appear patchy.
If the paint is not applied correctly or a low-quality paint is used, it will fade, chip, and crack easily.
After caulking and painting, your siding is complete.
After the siding is installed
Once the project is finished, the cleanup and detailing begin.
A quality contractor will reinstall the outlet covers, light fixtures, and any outdoor fixtures that had to be removed for the project.
A thorough inspection of the area should be performed to ensure no debris is left behind. Some contractors use a large magnet like a metal detector to go over the area and pick up any nails or pieces that may have fallen during construction.
If the debris is left behind, this can be dangerous to anyone around your home as they could accidentally step on a sharp object and injure themselves.
You should also be instructed on what to do if something goes wrong with your siding, which should be included in the warranty.
How can you tell if your siding was properly installed?
There are several ways to tell if your siding was installed properly. Here are a few signs to look for:
- Straight and level: The siding should be installed straight and level across the entire length of the wall. You can check this by standing back and visually inspecting the siding for any waviness or irregularities.
- Tight and secure: The siding should be tightly fastened to the wall and any gaps or spaces should be filled with appropriate flashing and sealant. You can check this by looking for gaps between the siding and the wall, or by pushing on the siding to see if it moves or shifts.
- Joints and corners: The joints and corners where two pieces of siding meet should be properly overlapped and sealed to prevent water from seeping in. You can check this by inspecting the joints and corners for any gaps or spaces, or by running your hand over the area to feel for any irregularities.
- No damage: The siding should be free from any damage or dents that could compromise its ability to protect your home. You can check this by visually inspecting the siding for any cracks, holes, or other signs of damage.
How to find a qualified siding installer in San Antonio?
There are several ways to find quality siding installers in San Antonio, Texas:
- Online directories: You can search for local siding installers on online directories like Yelp, Angie's List, or HomeAdvisor. These directories typically include customer reviews and ratings that can help you choose a reliable and trustworthy contractor.
- Local referrals: Ask your friends, family, or neighbors if they've had siding work done recently and if they would recommend their contractor. Word-of-mouth referrals are often a reliable way to find a reputable contractor.
- Manufacturer websites: If you have a specific siding material in mind, you can visit the manufacturer's website to find a list of authorized installers in your area.
- Professional associations: Check with local professional associations like the National Association of Home Builders or the National Association of the Remodeling Industry to find a list of qualified siding contractors in your area.
Before hiring a contractor, be sure to check their licensing and insurance status, as well as their experience and references. It's also a good idea to get multiple quotes and compare them to find the best value for your project.
Ensuring you get a quality siding replacement
Researching, asking questions, and knowing what all goes into a siding replacement are going to help you in choosing the right contractor and getting a high-quality siding replacement.
In the home remodeling industry, what you get is what you pay for. You cannot get the highest quality installation for the lowest price.
Knowing what you want out of your project and what you are going to get is necessary to help you make the right decisions.
Southwest Exteriors has over 30 years in the siding replacement industry and has seen plenty of low-quality siding jobs. We want to not only offer you the highest quality products and services but educate you on what goes into those replacements so you can make the distinguishment for yourself.
Interested in how much a siding replacement costs? Check out this article where we detail the top factors that affect the cost of a siding replacement.