
When you think of getting a new door, you may think it’s as easy as unscrewing the hinges and putting the new door in place.
However, installing a new door requires many steps, and replacing the entire system is necessary to ensure a quality installation. This should consist of replacing the threshold, jambs, hinges, hardware, and slab, or the part that swings.
What all goes into the installation of a new door, and what should be included?
Knowing the steps of a door replacement will help you feel more confident and comfortable with your project and help you avoid a low-quality installation.
Southwest Exteriors has been a San Antonio home remodeling contractor since 1989, and we have replaced hundreds of high-quality doors in our time.
Our design consultants, project managers, and installers know what should be included in a door replacement and are certified by the door manufacturers to ensure the door system is installed correctly and with quality and care.
This article will outline the door replacement process step by step with Southwest Exteriors, from the technical measurements to the final touches.
After reading, you will know what exactly goes into a door replacement installation and understand each step's value and why it is necessary for a quality installation.
Before your door installation
Once you have committed to your project, we’ll schedule a date at your earliest convenience where one of our project managers can come to your home and do a technical measurement that should take around an hour.
During this meeting, we will inspect the project area, double-check the measurements of the door to compare to the original measurements and answer any questions you may have.
We will also go over the details of the door you have chosen, such as the color, hardware, design, and trim.
You will be given a checklist that goes over anything to prepare before the actual installation.
Pre-installation checklist
A door replacement does not require as much prep as a window or siding replacement, for example. However, there are a few items to prepare beforehand.
Check with your homeowner’s association if necessary
Some homeowner associations have strict policies regarding styles and designs for doors. If your homeowner’s association requires prior approval for any home remodeling project, you must check with them to approve the project.
We can assist you in doing so if needed.
Move any furniture away from the project area
If any outdoor or indoor furniture obstructs the door’s movement or comes close to the perimeter, we ask that you move it all away from the door to ensure there is plenty of workspace and nothing gets damaged.
Remove all decorative items on walls away from the door
When working on and around walls, sometimes the construction can cause movement in the walls nearby. We do not want any decorative items or picture frames to fall and break during construction.
Contact your alarm company
If you have an alarm on your door, we will have to remove it during the installation. With generic magnetic alarms and most camera-connected alarms, we can reconnect and test it for you once the replacement is finished.
If the alarm system is more complex, you will need to have your alarm company come to your home to reconnect the alarm properly following the door replacement.
Ensure all pets and young children avoid the work area
The installation crew will be working with tools and materials that can be dangerous when tampered with. We ask that all pets be secured and young children avoid the work area during construction to avoid any accidents.
You will also have contact information for our Project Managers, Jim and Joshua, and Client Experience Champion, Michele, if you have any questions or concerns on this checklist.
Before the actual installation day, we also want you to be aware of the safety measures the crew will take and how cleanup will be handled.
Safety precautions and cleanup
As guests in your home, we want to do everything we can to respect your space and keep it as clean as possible.
Here is what you can expect from the installation crew during your door replacement:
-
The crew will wear booties at all times when inside your home.
-
Masks will be worn at all times when inside your home.
-
Tarps will be put down on the interior and exterior of your home surrounding the door.
-
The work area will continuously be vacuumed and cleaned, and trash and debris will continuously be taken to the dumpster.
The day before your installation day, a project manager will call you to introduce you to the crew, give you an estimated arrival time, and answer any last-minute questions.
Now that you have prepared for installation day and know what to expect, next comes the actual installation.
Door replacement installation day
The most exciting part of your door replacement project has come, but it can be a little nerve-wracking if you don’t know what to expect. Now we will outline the actual installation of the door replacement so you know what to expect that day.
A typical door installation will take about four hours, but depending on the size and complexity of the door, it could be longer.
Crew arrival
The morning of your installation, you will receive a call or text from the crew leader letting you know they are on the way with an ETA.
Once the crew arrives, they will introduce themselves to you and talk with you through the project. One of the first things they will do is show you your new door to make sure everything is correct.
If something is wrong with the door or it was not ordered properly, then a project manager will be contacted immediately to sort it out. The door will also be remeasured to ensure it will fit.
This very rarely happens, so do not let any access anxiety about it creep in.
The crew will then put tarps down around the door on the interior and exterior and begin disassembling the existing door.
Removing the existing door
The first step to removing the existing door is removing the surrounding interior and exterior trim.
If you have a special decorative trim that you would like to keep with the new door, we will put it to the side to put back on later.
Once the trim is removed, we will take out all of the screws in the hinges to then remove the actual door system, which includes the hinges, jambs, slab, and threshold.
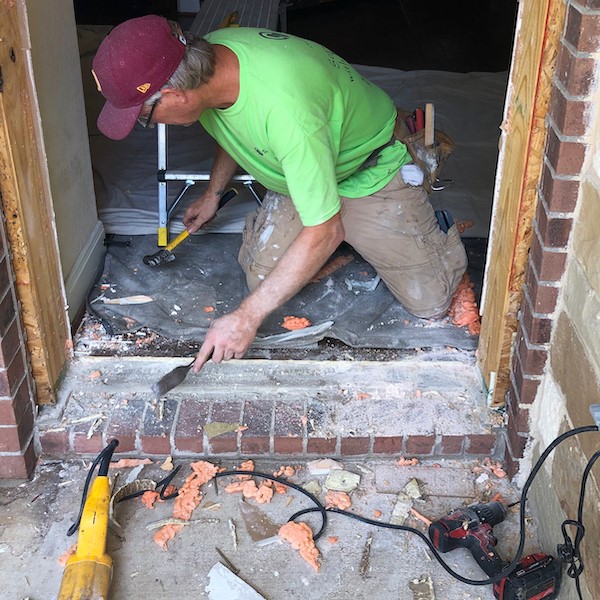
After the door has been taken out, we will clean the opening and bottom concrete and inspect the frame to look for any rot or damage that needs repair. If any rot is found, we will show it to you and let you know how we will fix it.
The crew always carries wood to replace rot in the frame. However, if it was not discussed in the contract and the rot is extensive, a change order may need to be made which will slightly inflate the price.
From here, we will measure the opening again in multiple spots vertically and horizontally to check again that the door is the correct size.

Example of a gutted door frame.
Installing the new door
Before installing the door in place, we must do a dry fitting. Basically, we will put the door in the frame as another measure to make sure it is correct.
Then we will caulk and weather seal the bottom of the opening to install the threshold, which is the ribbed metal piece at the bottom of the door.
The hinges will then be screwed on the interior of the door frame through the jamb to the wall. We use 3.5 in. screws that secure the door all the way to the stud into the wall.
Understanding the anatomy of the door is important. While we refer to the slab and jamb of the door as separate parts, they come connected.
Think of the jambs like a frame around the slab. There is about a ¼-½ inch gap between the slab and the jamb. This gap will be filled with wooden shims to level the door. The shims are long, thin pieces of wood about 1.5 inches wide that are shaped like a small wedge.

Example of wooden shims.
The door must be leveled horizontally and vertically for it to fit and function properly. This leveling ensures that when you open the door and stop it at any point in the swing, it will remain in the same position and won’t swing one way or the other.
The foundation of your home continuously shifts with the earth through time. This shifts the frames slightly and means the opening for your door is not perfectly rectangular.
In order for the door to be leveled and installed correctly, shims will be wedged between the jamb and the frame to make the side jambs perfectly perpendicular to the ground.
Once the door is leveled properly and the shims are in, next comes the hardware, which consists of the handle, or knob, and lock system.
If you have previously bought a lock system that you would like to use in your new door, we can usually install that for you. The only reason we would not be able to is if the backset and bore do not fit.
These two parts of the slab are precut where the latch and locking system go.
Then we will make sure that the door opens and closes correctly and the locks and hardware work.
Now that the jambs, slab, threshold, and hardware are installed properly, it’s time to foam around the door and put the trim back on.
We will fill in and around the door jambs with expanding foam to seal in the shims and any small cracks or gaps surrounding the door.
Expanding foam is the most effective filler used for window and door installations because when it is applied, it continues to expand until it intersects with an object.
The trim is nailed in around the door using finishing nails. Then, it is caulked around the edges of the trim using a caulk with a 50-year lifespan.
Typically, we will install the trim on the interior of the home first, then foam from the exterior. This helps for a cleaner application so that the foam will expand to the interior trim.
If the foam is applied before any trim, this is not an incorrect application, but it will have to be cleaned up on both the interior and exterior before installing the trim.
After the trim is completely installed and caulked, we will check to make sure that when the door is closed, there is no light coming through around the edges. This means the door is properly sealed.
Lastly, we will reinstall your alarm system unless the alarm company was contacted prior to reinstalling it.
This completes the main installation day. We will show you the door, how it operates, how it locks and unlocks, and go over the warranty for your door.
Southwest Exteriors offers a lifetime warranty for your door for its lifetime in your home. We will cover the labor and installation, and each door manufacturer offers their own warranty for the product.
The warranty also covers adjustments, so if your door stops functioning as it should, we will come out and adjust the hinges to get it back to where it needs to be.
The caulk and sealant must sit for the rest of the day to completely cure, then the following day, we will have what we call a punch list crew come out to detail the painting of the trim.
Following up the installation
Typically the next day, or the closest day for your convenience, our punch list crew will come out and paint the trim around the door and do a final cleanup.
We can use a paint you already have or use a paint that you chose during the decision-making process.
Another element that the punch list takes care of is filling under the threshold. Sometimes, the lip of the threshold will hang over the door opening slightly, meaning there is empty space underneath the threshold that must be filled.
This space is commonly filled with concrete to ensure a sturdy base when the threshold gets stepped on.
If you have any other follow-up questions, confusions, or concerns with your door operation, this gives us another chance to answer those for you as well.
We want you to be assured and confident of all the details of your door, installation, and what to do if something goes wrong.
Ensuring you get a high-quality door replacement
Now that we have gone through the entire door replacement installation, you know exactly what to expect from the pre-construction consultation to the finishing touches.
Knowing all the steps of the door replacement installation process helps you to feel more comfortable and confident that you are getting the best quality installation.
With Southwest Exteriors, we want to communicate with you throughout the entire process. We never want you to feel like you’re in the dark or be unaware of anything along the way. If anything is wrong or does not meet your expectations, we will do everything we can to make it right.
Want to know how much a door replacement costs? Check out this article that details the top factors that influence the cost of a front door replacement.